THE BEST SELLING PEARLIE PATTERN IS NOW IN WOMEN'S SIZES!
0 Cart
Added to Cart
    You have items in your cart
    You have 1 item in your cart
    Total
    Check Out Continue Shopping

    News — Pearlie Dress

    Tutorial: Dolman Sleeves - How to Tweak Your Pattern to Make Hemming a Breeze

    Tutorial: Dolman Sleeves - How to Tweak Your Pattern to Make Hemming a Breeze

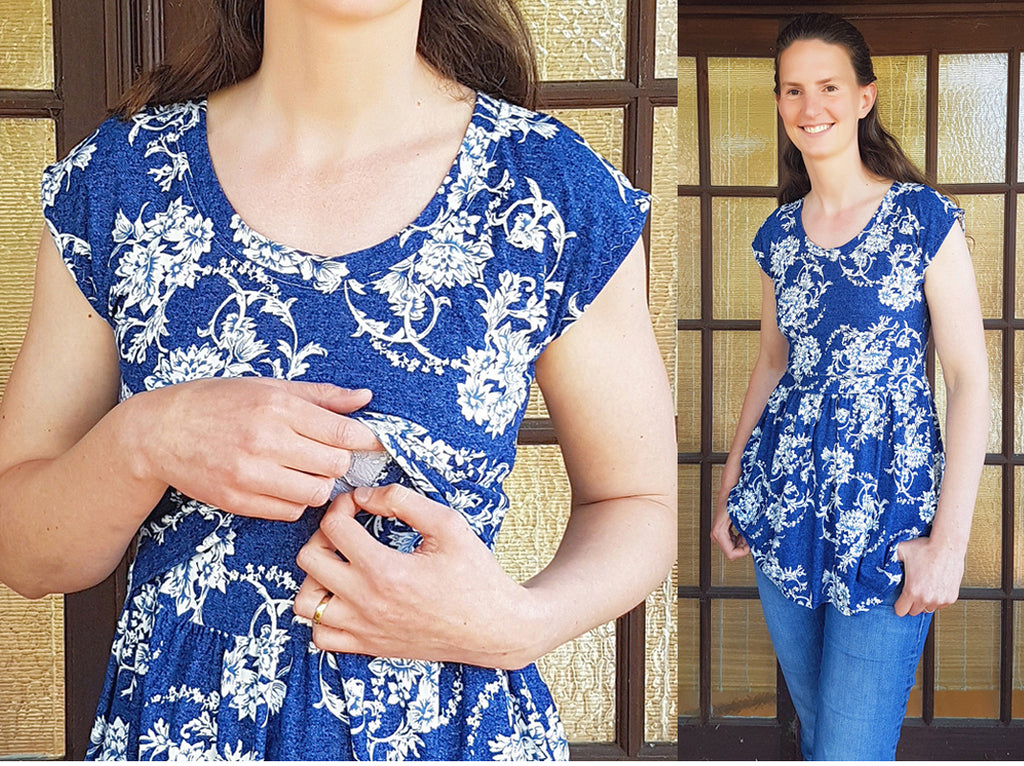
    Dolman sleeves are an easy-sew option when you want more coverage than a sleeveless dress or top without the added time and effort of sewing set-in sleeves.

    This sleeve type is a feature of both the girl's and women's Pearlie Dress & Peplum Top PDF Sewing Patterns.

    Some of you have mentioned that you find it tricky to turn and hem the sleeves when sewing your Pearlies, especially at the base of the armhole.

    If this is your least favourite step (and especially if you are working with a type of fabric that doesn’t allow you to manipulate the area easily) you should definitely give this method a go!

    In this tutorial, I’ve used a regular machine set on a stretch stitch to sew the side seams of the Bodice. The tight corner would make it hard to sew with an overlocker/serger but you could instead finish each side of the Bodice Front & Back with a zig-zag or overcasting stitch on your regular machine before sewing them together. The shoulder seams, skirt seams and neckband can, of course, be finished with an overlocker/serger as usual.

    Also, note that the pattern instructions (for the original gathered skirt Pearlie) have you attaching the Skirt Front & Back to the Bodice Front & Back before sewing the side seams. But in this example, having already sewn the Bodice side seams, I’m going to attach the skirt in the round.

    (Note: if using the circle skirt add-ons for the Pearlie Dress or Top  you would, as per the instructions, be attaching the skirt in the round.)

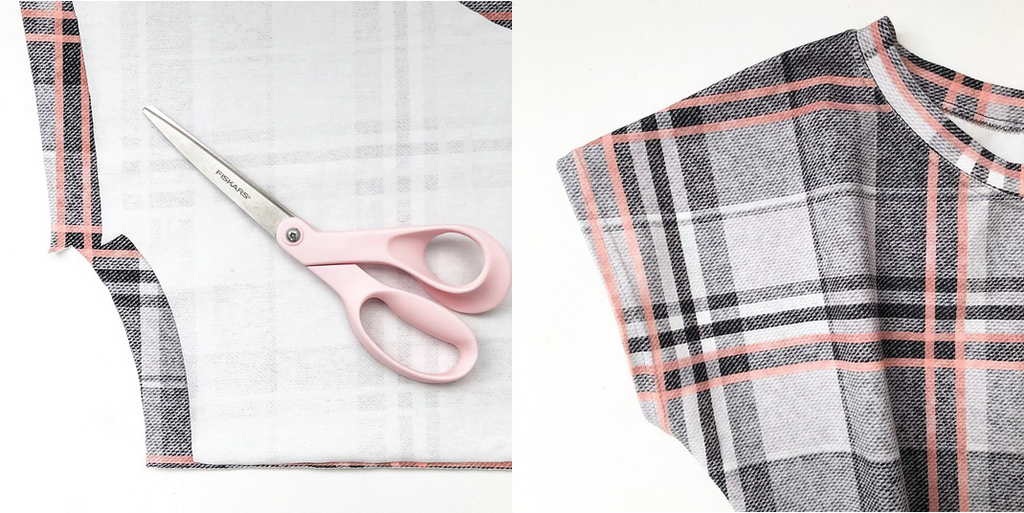
    Step 1: MODIFY THE BODICE PATTERN PIECES

    The Bodice pattern pieces have you cutting the hem allowance horizontally out from the base of the armhole in a straight line. Instead of cutting them in that way, “mirror” the shape at the top of the side seam where it intersects with the armhole in a downward facing “v”. You will need to go 1cm (3/8”) down from the intersection. It would be best to do this by tracing off your pattern pieces with the revised shape and using it as your new template rather than just eye-balling it while cutting!

    Step 2: SEW SHOULDER SEAMS & SIDE SEAMS

    Sew the shoulder seams, finish seam and press.

    Sew the side seams using the stretch stitch on your machine. (You could mark the stitch lines with a soluble marker to help with accuracy).

    Use some sharp scissors to make a small snip half way into the corner of armhole where the stitch direction changes. Press seams out.

    Step 3: PRESS SEAM ALLOWANCE

    Press armhole hem all the way around. The photos shows you what it looks like from the inside.

    Step 4: TRIM EXCESS

    You can snip off the little bits of excess fabric that peep out from under the hem if you wish.

    Step 5: READY FOR HEMMING!

    You can see that the armhole hem allowance is sitting nicely even before stitching. This was our goal here, so YAAY!

    Your armholes are ready for hemming in your preferred way using a single or twin needle or zig-zag stitch.

    Tutorial: How to Adapt Your Pearlie Dress & Peplum Top for Nursing/ Breastfeeding

    Tutorial: How to Adapt Your Pearlie Dress & Peplum Top for Nursing/ Breastfeeding

    This modification is the original idea of one of our pattern testers Isaline (@isalinestinystitches). Isaline needed to make her Pearlie Peplum Top nursing friendly and modified the pattern using a clever layering system for the Front Bodice.

    How does it work? There's a layer underneath the Front Bodice with a deep "v" cut-out which attaches to the top of the peplum skirt. The Front Bodice has a horizontal waistband which sits free of the peplum skirt and can be lifted up and away to access the "v" cut-out. 

    Isaline kindly offered to share her tutorial with Peach Patterns customers and put together the following step-by-step instructions so that you can make your own nursing-friendly Pearlie:

    WHAT YOU'LL NEED:

    • The Pearlie Dress & Peplum Top PDF Sewing Pattern for Women;
    • Your fabric. You'll need an extra bodice length of fabric plus about 4" (10cms) to make your inner "v" layer and waistband for the Bodice Front in addition to the yardage set out in the pattern instructions;
    • A pen, ruler, clear elastic and a double sided water soluble sewing tape (Wonder Tape brand for example). The last two are optional but highly recommended for a professional result and to make sewing easier.

    STEP 1: CUT FABRIC PIECES

    (NOTE: if you need to shorten or lengthen your Bodice Front pattern piece to adjust for your height, do this before the steps below).

    • The Bodice Front pattern piece should be lengthened by 1/2" (12mm) at the bottom edge.
    • For the Bodice Front waistband you will need to cut a rectangle of fabric as follows. Measure across the bottom of your Bodice Front and multiply by 2. Multiply again by 0.85 and add 3/8" (1cm) for seam allowance. This is the width of your band. The height of your waistband is 3.5" (9cms). 
    • To make your inner "v" layer take your Bodice Front pattern piece and draw a deep "v" from the inner shoulder to at least 3" (7.5cms) above centre front. (The photo below shows you how to do this). To check that you've got it right, place the pattern piece over your chest. The "v" should finish about 1" (2.5cms) higher than the bottom of your bra.  Draw an additional line from the side of the pattern piece straight up to the shoulder. Fold your pattern piece along the new lines to cut your "v" layer or trace it off onto another piece of paper.
    • All other pattern pieces are unmodified and should be cut as indicated in the pattern.

    STEP 2: SEW ELASTIC TO THE INNER "V" LAYER

    • Place some lengths of clear elastic along the inner edges of the "v" as shown in the first photo below using your double sided tape to keep the elastic in place.
    • Fold the edges of the fabric over to encase the elastic and pin or secure with clips.  You will need to make a small cut into the point of the "v" to help you fold that area.
    • Stitch using a large zig-zag or stretch stitch as shown in the second photo below making sure you don't stretch the elastic as you sew.
    • Finish the sides of your inner "v" layer with an overlocker/serger or zig-zag stitch (optional).

    STEP 3: ATTACH THE WAISTBAND TO BODICE FRONT

    • Fold your waistband in half wrong sides together lengthways and press.
    • Match the middle of the long raw edges of the waistband to the centre front of your Bodice Front and pin or clip the fabric through all layers (see photo below).
    • Sew using your overlocker/serger (or with a stretch stitch), stretching the fabric slightly as you sew to fit across the width. 

    STEP 4: GATHER SKIRT/PEPLUM TOPS AND ATTACH TO BODICE

    • Gather and attach the Skirt Back to the Bodice Back.
    • Gather and attach the Skirt Front to the inner "v" layer.

    STEP 5: FINISH BODICE ASSEMBLY

    • Pin your Bodice Front/waistband right sides together with your Bodice Back/Skirt Back (see first photo below).
    • Pin the inner "v" layer/Skirt Front over the top right sides down (see second photo below).
    • Sew the shoulder seams and side seams through all the layers and finish with your overlocker/serger or zig-zag stitch.
    • Finish the neckband and hem following the sewing instructions in the pattern.

    And that's it! Come over and join us in the Peach Patterns Sewing Group on Facebook to share pictures of your new dress or top.

    Tutorial: Making the Peach Patterns "Pearlie Dress" With Easiest Ever Fold and Sew Knit Neckline

    Tutorial: Making the Peach Patterns

    Fans of the the Peach Patterns Pearlie Dress & Peplum Top will know that this pattern is already a really quick sew. Having said that, attaching neck bands is usually the number one cause of heartache associated with sewing patterns for knit or stretch fabrics.

    At some stage you will definitely want to try and make a neck band for your Pearlie Dress. There are two options (narrow and standard) and, really, they are fun to make. But if you're in a rush or are new to sewing with knits then you might like to give this method a try. 

    Making your neckline in this way creates a slightly different look: less "t-shirty" (if that's a term?) and a little more dressy.

    All you will need is a twin sewing machine needle for stretch fabrics and two spools of thread in the same colour. Fusible hemming tape is optional but not required (we made ours without using hemming tape). 

    Enjoy these pictures of our Pearlie Dress taking a twirl in the park and then scroll down to check out our tutorial for the "Easiest Ever Fold and Sew Knit Neckline". (I made this Pearlie dress with the slim fit bodice option. However as you can see there's still some ease in the bodice as I sized up to allow room for growth.)

    HOW TO MAKE THE FOLD AND SEW NECKLINE FOR YOUR PEARLIE DRESS OR PEPLUM TOP:

    Supplies:

    • Twin sewing machine needle for stretch fabric (My preferred needle for finishing necklines, armholes and hemming knit fabrics is the Schmetz Size 75/4.0mm Twin Stretch Needle.)
    • Two spools of thread in the same colour.
    • Optional: Fusible hemming tape to press and hold the fabric around the neckline seam before sewing. (As mentioned, I made my dress without using the tape.)

    Step 1

    Extend the neckline area of your Front and Back Bodice pattern pieces by 1/2" (15mm) evenly all the way along (see diagram below).

    You can do this by either:

    A. Placing your original pattern pieces on some tracing paper/pattern paper and drawing the modified lines around the pattern pieces before pinning them to your fabric; OR

    B. Pinning your original pattern pieces to your fabric and using an erasable fabric marker to mark the extended cutting lines on your fabric.

    It will help to use a tape measure to mark some points at 1/2" (15mm) all the way along the new curves before connecting the points with your marker.

    Step 2

    After sewing the Front and Back Bodice pieces together as indicated in the sewing instructions, press the shoulder seams and then press down the neckline area wrong sides together by 3/8" (1cm).  (Note: if you choose to use fusible tape for this step, follow the manufacturer's instructions to apply and press the fabric/tape together.)

    Step 3

    Insert your twin needle into your sewing machine, thread it and sew around the neckline 3/8" (1cm) from the folded edge. Sew carefully making sure you catch the raw edge on the wrong side of the fabric with your bobbin thread. (If you are new to sewing with twin needles you may want to have a practice on a piece of folded fabric first to ensure that you are using the correct seam allowance). 

    Give the neckline area a press and that's it! Finish the remaining steps of the sewing instructions and enjoy your new Pearlie :)

    Pattern: Peach Patterns Pearlie Dress & Peplum Top for Girls Sizes 1-12

    Fabric: "Alaska White" Digital Print Knit Fabric from Dizzy Daisy Fabric Studio

    If you have a go at this tutorial I'd love you to share your pictures in our Peach Patterns Sewing Group on Facebook or on Instagram with the hashtags #peachpatterns #pearliedress

    Tutorial: The "Pearlie Dress & Peplum Top": Sewing Perfect Gathers

    Tutorial: The

    Sewing perfect gathers between the bodice and skirt on your Pearlie Dress or Peplum Top isn't hard and will give your finished dress a truly professional edge.  There are several ways to get nice even gathers when sewing knit fabrics but the one we use in the pattern is a real "game changer" (I'm quoting the Pearlie pattern testers here!).  

    This method is also an especially good confidence booster if you're new to sewing with knits because it's simple and has such great results.

    **** Haven't got your Pearlie Dress pattern yet? Hop over to One Thimble and grab a copy either as a standalone pattern or, better still, as a package with the other great patterns in One Thimble Issue 16. For more inspiration and to see all the amazing Pearlies that have been posted by our lovely customers, join the Peach Patterns Sewing Group and One Thimble Sewing Enthusiasts group on Facebook. ****

    This tutorial outlines the very first steps you will take to sew your Pearlie Dress or Peplum after cutting your fabric pieces. Taking a bit of extra time and care here will set you up for success with the rest of your sewing.

    NOTE: There are two bodice and neckband options in the Pearlie Dress pattern and for this version I used the "relaxed fit" bodice and the "standard" neckband.  The dress was made in a straight Size 8 and the fabric details and links are at the end of the tutorial.

    SO, let's get started:

    ASSEMBLE YOUR SUPPLIES

    The things you'll need are a stretch needle, your regular thread, some shirring elastic and an empty bobbin case. 

    Insert the stretch needle into your sewing machine shank and thread it with your regular thread.  Take the empty bobbin and wind your shirring elastic around it by hand until the bobbin is full.  The idea here is to wind the elastic on firmly but without stretching it too much.  Load the bobbin with your shirring elastic into the bobbin case as you would with regular thread.

    SEW YOUR GATHERING STITCHES

    Set your machine to the longest stitch length.  On the right side of your SKIRT FRONT and BACK pieces sew a row of stitching just under the top raw edge. (Make sure you start (and finish) sewing just over 1cm (3/8") in from the side seams (as marked on the pattern pieces). This will ensure the seam allowances at each side of the dress are free of gathers.  And yipeee (!) you'll notice the fabric will begin to gather a bit as you sew.  The real magic starts, though, when you sew another row of stitching just under the first one.  Hold the fabric as flat as possible without stretching it too much and sew completely parallel to your first row.  Your fabric will gather up nicely - step back to admire!  

    Here are some front and back views of your fabric after this step:

    Your shirring elastic will most likely have done the trick to reduce the width of your skirt pieces to match the width of your bodices.  You can check this by laying the pieces parallel as in the photo below. If they're still too wide, however, simply lay the skirt pieces on your ironing board and give the gathers a few shots of steam while holding the iron just above the fabric (don't press the actual fabric).

    FIND THE CENTRE POINT OF BODICE & SKIRT PIECES

    Fold your BODICE and SKIRT pieces in half and mark the centre of each with a pin as shown in the photo below.

    SEW BODICE and SKIRT PIECES TOGETHER

    A little word of caution here so you don't do what *someone I know* (ahem) once did whilst sewing her Pearlie Dress i.e. sew the BODICE FRONT and SKIRT BACK together.  The SKIRT BACK is the longer of the two skirt pieces and needs to be matched with its partner, the BODICE BACK.

    Taking your SKIRTS and BODICES, match the centre points marked by your pins and aligning the raw edges, pin your pieces right sides together.  I use LOTS of pins and remove them as I sew!  

    (You will notice (as the photo below shows) that the bodice fabric has a tendency to bunch up when it's pinned to the skirt.  Because of this you need to take extra care when sewing over your gathers to keep smoothing out the layer of (bodice) fabric underneath.  If the bodice fabric does double over and get caught in the stitch line, there's no need to unpick the whole seam: simply unpick and re-sew the affected area.)

    Sew your skirt and bodice pieces together just under the second row of gathering stitches. For the sake of precision I use a regular machine to do this step and then finish the seam with my overlocker (serger) afterwards.

    Sewing machine:

    Overlocker (Serger):

    PRESS SEAM UPWARDS

    And that's really all there is to it! After a quick steam and press with your iron (lay fabric wrong side up and press seam upwards with tip of iron), you have gorgeous gathers and (after doing a little happy dance!) can go on to sew the rest of your Pearlie Dress.

    The knit fabrics used for this Pearlie Dress are Art Gallery Solids in Crystal Pink from Bebeloush Designs for the bodice and Rainbow Pastel Watercolor Moroccan by Micklyn on Spoonflower for the skirt. (I chose the Spoonflower Cotton Spandex Jersey as my base fabric for this print).

    Don't forget to grab your copy of the Pearlie Dress sewing pattern over at One Thimble

    One Thimble

    Stay in the Peach Patterns loop and: 

    Follow my blog with Bloglovin

    (This post contains affiliate links.)

    Coming Soon! The "Pearlie Dress & Peplum Top"....

    Coming Soon! The

    Yipee! The Peach Patterns "Pearlie Dress & Peplum Top" sewing pattern will soon be in store.  In the meantime, you can get your hands on this pattern over at One Thimble Digital Sewing Magazine where it is part of the jam-packed (Down Under) 2017 Spring Issue 16.

    This is Peach Patterns' first digital PDF sewing pattern for knit fabrics and it was such fun to create. You can whip up a "Pearlie" in no time at all and it's guaranteed to be your girl's favourite every day dress or top....

    (Photo Credits: One Thimble)

    One Thimble