THE BEST SELLING PEARLIE PATTERN IS NOW IN WOMEN'S SIZES!
0 Cart
Added to Cart
    You have items in your cart
    You have 1 item in your cart
    Total
    Check Out Continue Shopping

    News

    "Mama Leilani Top & Dress": Pattern Options

    I hope you’ll enjoy this (long-overdue) round-up of the Peach Patterns Mama Leilani Top & Dress PDF Sewing Pattern. Part 1 (this post) explains all the different options that come with this pattern, tips on sewing and links to blog reviews.  Part 2 contains some great fabric suggestions (lots of crafty eye-candy there!) and an online resource list.

    Top (with Single Ruffle Overlay): Sewing this option is recommended for an easy way to get to know the Mama Leilani pattern! It doesn’t require much fabric and you can quickly get a feel for the fit and gain the confidence you need to make the dress. Team your Mama Leilani Top with shorts or jeans for everyday wear or a pencil skirt/ slim fit pants for a dressier look.

    Top (with Double Ruffle Overlay): The extra layer and fabric folds that are a feature of the double ruffle are really pretty and emphasize the feminine look of the top. 

    It’s important when making the double ruffle option to use a fabric which behaves well during sewing and when the top is being worn.  Lightweight is better for this option! Think rayon, lightweight lawn, voile or gauze. Or (if you’re game!) try chiffon, crepe or other silky fabrics. (Part 2 of this series has lots of suggested fabric options for you to check out).  Also search Google and Pinterest for tips on sewing silky or slippery fabrics and use a combination of pattern weights (food cans can double as these) and lots of pins when cutting. 

    A few customers have asked whether constructing the double layer is complicated and the answer is no! With both pieces right sides out, you simply baste the shorter ruffle over the top of the longer ruffle around the neckline and armholes. Then turn the piece wrong side out and attach it over the top/dress (which is also wrong side out in this step) in the same way as you would a single ruffle. (The sewing instructions contain all the details you need).

    Knee-Length Dress: For the perfect easy-wearing summer sundress you’ll want one (or more) of these in your wardrobe. Or create a special occasion dress with the pattern by using black silk or crepe (just add heels and your favourite statement jewellery to complete the look). In fact the Knee-Length Dress looks equally good with summer sandals or heels. And as with the top, you can add a single or double ruffle overlay.

    High-Low Dress: Add some drama with the High-Low Dress option. The three-quarter length makes it a more dramatic option for evening wear and date nights while still really practical to wear and walk in.

    Adjustable Strap or Shoulder Ties: You can choose to make regular shoulder ties or adjustable straps for your Mama Leilani Top or Dress. If you’ve never made adjustable straps before you’ll be surprised how easy (and satisfying!) they are to do. The sewing instructions contain a full photo tutorial with a thorough step-by-step explanation. Check out Part 2 of this blog series for links to suppliers that offer a range of pretty ring and slider hardware packages to make your adjustable straps. 

    Creating a Faux-Romper Look: Mama Leilani Top teamed with Avalon Shorts

    After releasing the Leilani Romper for Girls, lots of you asked for it to be offered in ladies sizes. After getting more thorough feedback we discovered customers wanted a slightly more practical option and decided to create a bundle of two patterns that give you the look of a romper but all the practicality of separates.  The Avalon Shorts for Women are easy-fit pull-on shorts and their relaxed boxy design is the perfect match for the Mama Leilani Top.  Get the patterns together in a (discounted) bundle and make them in the same fabric for an instant romper/playsuit look.

    The shorts can also be purchased as a standalone pattern here (and are a great summer staple that you can wear with any of your favourite tops or tees).

    Mama Leilani & Leilani Dress for Girls Bundle

    The Mama Leilani was a spin-off of the previously released Leilani Dress for Girls. Get the women’s and girls' pattern in a (discounted) bundle and make one for your mini-me as well!

    Layering, Embellishing, Pattern Hacks:

    Add a cute cardigan or jacket over the top of your Mama Leilani for when the weather cools.

    Try embellishing the top or dress with a lace overlay or hem. Or add pom-poms or trim to the ruffle overlay or hem.

    If you're feeling adventurous, there are lots of ways you can modify the pattern to put a unique touch on your top or dress. Sarah of Sweet Meadow Threads made a dramatic maxi dress with her Mama Leilani pattern after seeing a similar one on Pinterest.

    Blog Reviews: Some of our lovely testers wrote blog reviews of their experience making their Mama Leilani Tops and Dresses and you can check those out below:

    Dagbjort made the Top with Single Ruffle and the High Low Dress. 

    Read Dagbjort's blog post.

    Susana made the Knee-Length Dress. 

    Read Susana's blog post.

    Tiffany made the Top with Single Ruffle and the Knee Length Dress.

    Read Tiffany's blog post.

    Sarah made the Knee-Length Dress.

    Read Sarah's blog post.

    Angeline made the Knee-Length Dress.

    Read Angeline's blog post.

    Thanks for reading and don't forget to check out Part 2 of this series which covers fabrics options and ideas for making your Mama Leilani: "Mama Leilani Top & Dress": Fabric Resources & Inspiration.


    Peach Patterns "Mama Leilani" Top & Dress PDF Sewing Pattern : Tester Call

    Peach Patterns

    I'm so excited to announce the tester call for Peach Patterns first womens' dress pattern. Following on popular demand for a "mama" version of our Leilani Dress for Girls which was launched last summer, we will soon have a grown up version available.  The Mama Leilani sewing pattern will have the added options of a top length, a single or double ruffle and adjustable bra-style straps (as well as ties).  You'll find the link to the tester sign-up form at the bottom of the post.

    The dress pictured is the Knee-Length option made in a lovely flowy rayon from Blackbird Fabrics (fabrics with a great drape-factor are essential to the design of this dress!) The other options are shown on the pattern cover illustration.

    The Mama Leilani is quick and easy to sew and will be your go-to top or dress for summer. It looks great in vibrant prints for everyday or you can glam it up by using a special fabric with the high-low version for a dramatic night-time look.

    INTERESTED IN TESTING THE MAMA LEILANI TOP OR DRESS?

    APPLY HERE 

    (Note: I will be running the test from 19 to 26 October 2017 in a closed Facebook Group which you would need to join.) The Size Chart and Yardage Chart are included on the form.

    If you want to be notified when the Mama Leilani releases (and hear other Peach Patterns news) be sure to sign up to our newsletter:

    Subscribe to our mailing list

    * indicates required


    Stay in the Peach Patterns loop and: 

    Follow my blog with Bloglovin

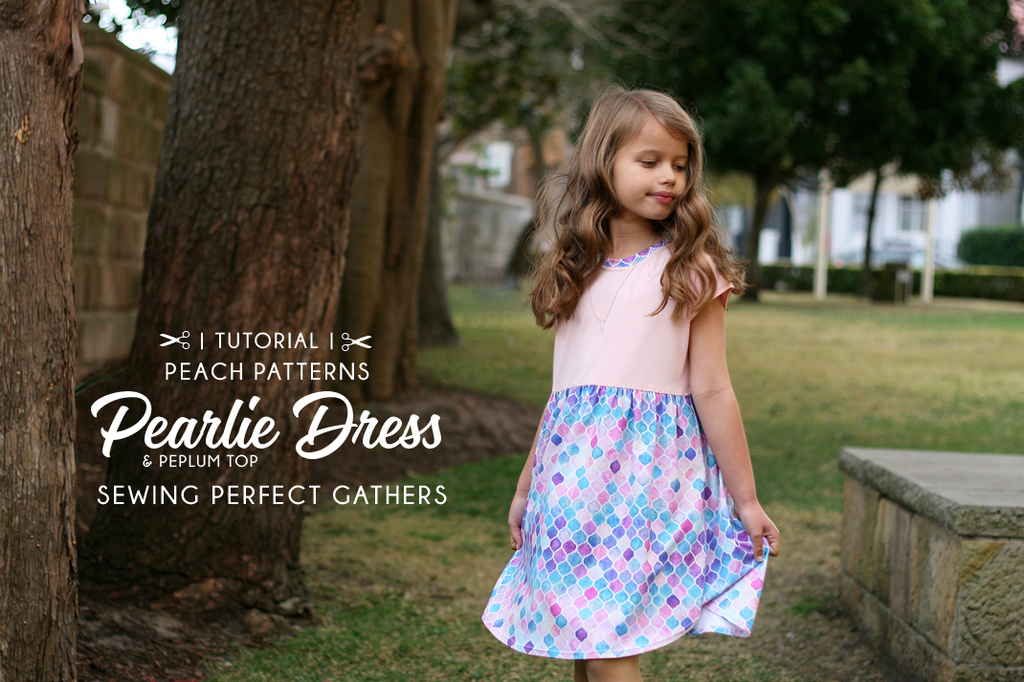
    Tutorial: The "Pearlie Dress & Peplum Top": Sewing Perfect Gathers

    Tutorial: The

    Sewing perfect gathers between the bodice and skirt on your Pearlie Dress or Peplum Top isn't hard and will give your finished dress a truly professional edge.  There are several ways to get nice even gathers when sewing knit fabrics but the one we use in the pattern is a real "game changer" (I'm quoting the Pearlie pattern testers here!).  

    This method is also an especially good confidence booster if you're new to sewing with knits because it's simple and has such great results.

    **** Haven't got your Pearlie Dress pattern yet? Hop over to One Thimble and grab a copy either as a standalone pattern or, better still, as a package with the other great patterns in One Thimble Issue 16. For more inspiration and to see all the amazing Pearlies that have been posted by our lovely customers, join the Peach Patterns Sewing Group and One Thimble Sewing Enthusiasts group on Facebook. ****

    This tutorial outlines the very first steps you will take to sew your Pearlie Dress or Peplum after cutting your fabric pieces. Taking a bit of extra time and care here will set you up for success with the rest of your sewing.

    NOTE: There are two bodice and neckband options in the Pearlie Dress pattern and for this version I used the "relaxed fit" bodice and the "standard" neckband.  The dress was made in a straight Size 8 and the fabric details and links are at the end of the tutorial.

    SO, let's get started:

    ASSEMBLE YOUR SUPPLIES

    The things you'll need are a stretch needle, your regular thread, some shirring elastic and an empty bobbin case. 

    Insert the stretch needle into your sewing machine shank and thread it with your regular thread.  Take the empty bobbin and wind your shirring elastic around it by hand until the bobbin is full.  The idea here is to wind the elastic on firmly but without stretching it too much.  Load the bobbin with your shirring elastic into the bobbin case as you would with regular thread.

    SEW YOUR GATHERING STITCHES

    Set your machine to the longest stitch length.  On the right side of your SKIRT FRONT and BACK pieces sew a row of stitching just under the top raw edge. (Make sure you start (and finish) sewing just over 1cm (3/8") in from the side seams (as marked on the pattern pieces). This will ensure the seam allowances at each side of the dress are free of gathers.  And yipeee (!) you'll notice the fabric will begin to gather a bit as you sew.  The real magic starts, though, when you sew another row of stitching just under the first one.  Hold the fabric as flat as possible without stretching it too much and sew completely parallel to your first row.  Your fabric will gather up nicely - step back to admire!  

    Here are some front and back views of your fabric after this step:

    Your shirring elastic will most likely have done the trick to reduce the width of your skirt pieces to match the width of your bodices.  You can check this by laying the pieces parallel as in the photo below. If they're still too wide, however, simply lay the skirt pieces on your ironing board and give the gathers a few shots of steam while holding the iron just above the fabric (don't press the actual fabric).

    FIND THE CENTRE POINT OF BODICE & SKIRT PIECES

    Fold your BODICE and SKIRT pieces in half and mark the centre of each with a pin as shown in the photo below.

    SEW BODICE and SKIRT PIECES TOGETHER

    A little word of caution here so you don't do what *someone I know* (ahem) once did whilst sewing her Pearlie Dress i.e. sew the BODICE FRONT and SKIRT BACK together.  The SKIRT BACK is the longer of the two skirt pieces and needs to be matched with its partner, the BODICE BACK.

    Taking your SKIRTS and BODICES, match the centre points marked by your pins and aligning the raw edges, pin your pieces right sides together.  I use LOTS of pins and remove them as I sew!  

    (You will notice (as the photo below shows) that the bodice fabric has a tendency to bunch up when it's pinned to the skirt.  Because of this you need to take extra care when sewing over your gathers to keep smoothing out the layer of (bodice) fabric underneath.  If the bodice fabric does double over and get caught in the stitch line, there's no need to unpick the whole seam: simply unpick and re-sew the affected area.)

    Sew your skirt and bodice pieces together just under the second row of gathering stitches. For the sake of precision I use a regular machine to do this step and then finish the seam with my overlocker (serger) afterwards.

    Sewing machine:

    Overlocker (Serger):

    PRESS SEAM UPWARDS

    And that's really all there is to it! After a quick steam and press with your iron (lay fabric wrong side up and press seam upwards with tip of iron), you have gorgeous gathers and (after doing a little happy dance!) can go on to sew the rest of your Pearlie Dress.

    The knit fabrics used for this Pearlie Dress are Art Gallery Solids in Crystal Pink from Bebeloush Designs for the bodice and Rainbow Pastel Watercolor Moroccan by Micklyn on Spoonflower for the skirt. (I chose the Spoonflower Cotton Spandex Jersey as my base fabric for this print).

    Don't forget to grab your copy of the Pearlie Dress sewing pattern over at One Thimble

    One Thimble

    Stay in the Peach Patterns loop and: 

    Follow my blog with Bloglovin

    (This post contains affiliate links.)

    The "Blouson Bomber Jacket" for Girls & Boys: Photo Round Up & Giveaway (Day 3)

    The

    Hi there! This is the 3rd and final day of our "Blouson Bomber Jacket" Photo Round Up and also your final chance to enter the pattern Giveaway (scroll down for entry form).

    The awesome Tanya @sewvolution made two jackets for her sweet girl which are equally fabulous. One in denim with a hearts print fabric peeping out of the pockets (and heart snaps at the front!) and the other in a gorgeous, girly floral.  I believe they've gotten a lot of wear (always love to hear that).

    Maggie Jaded Threads made one for her little boy (how cute is he??) in a stretch fabric.  There's a little surprise for "Moana" fans on the jacket. If you look closely at the print you can see lyrics from all the songs.

    Carlie @thefabricmamma made jackets for her girls in mermaid and unicorn print fabric which they suggested she buy on a joint shopping trip. They have great taste and their mum is a fantastic sewer so it was a win win :)

    Thanks to all the amazing ladies who were featured in our blog series and thanks to everyone who followed along! The Giveaway will be drawn on 13 September and you can enter below:


    a Rafflecopter giveaway


    Stay in the Peach Patterns loop and: 

    Follow my blog with Bloglovin

    The "Blouson Bomber Jacket" for Girls & Boys: Photo Round Up & Giveaway (Day 2)

    The

    Welcome to Day 2 of the Peach Patterns "Blouson Bomber Jacket" Photo Round Up & Giveaway. (Check out Day 1 of the Round Up here).  

    I have lots more great jackets to show you today including the one below by Karen @poshbotscreations / Karen G - Pieces of Me. Karen made the jacket for her daughter in a stretch cotton sateen with a beautiful flowers and birds print on a pink background. The pocket backs and facings are in a solid navy which coordinates nicely with the print.

    N.B. If you're in Australia, Spotlight has a range of both printed and solid cotton sateen permanently in stock (not an affiliate link).  This type of fabric is a great choice for the design as it's a nice mid-weight and with just that bit of stretch, the jacket is both easy to sew and really comfortable to wear.

    The next jacket was made by Saskia @shewhosewsuk / She Who Sews and is a great example of how this design works equally well for boys.  Saskia put a lot of effort into finishing and photographing the jacket.  You can see the lovely details in the close-up photo of the pocket and also the one which gives a peek inside the jacket.  Am in total admiration of those bias bound seams! Saskia was also kind enough to put together this great blog post where she explains more about making the pattern for her young man.

    Last but not least is the gorgeous jacket made by Livia @livia.jy for her lovely daughter who is always keen to model her mama-made outfits with a great big smile on her face! The quilted cotton is another great fabric choice for the jacket and what's not to love about this pretty floral?

    Grab a copy of the pattern here or be sure to get your entry in to the giveaway and be in the running to win one of 6 copies of the pattern (the winners will be randomly drawn on 13 September). If you're not already in the Peach Patterns Sewing Group join up now to boost your chances or if you're already a member just leave a comment on the blog. Stay tuned for our final post of the series coming soon.

    a Rafflecopter giveaway


    Stay in the Peach Patterns loop and: 

    Follow my blog with Bloglovin