THE BEST SELLING PEARLIE PATTERN IS NOW IN WOMEN'S SIZES!
0 Cart
Added to Cart
    You have items in your cart
    You have 1 item in your cart
    Total
    Check Out Continue Shopping

    News — Womens Dresses

    Tutorial: How to Adapt Your Pearlie Dress & Peplum Top for Nursing/ Breastfeeding

    Tutorial: How to Adapt Your Pearlie Dress & Peplum Top for Nursing/ Breastfeeding

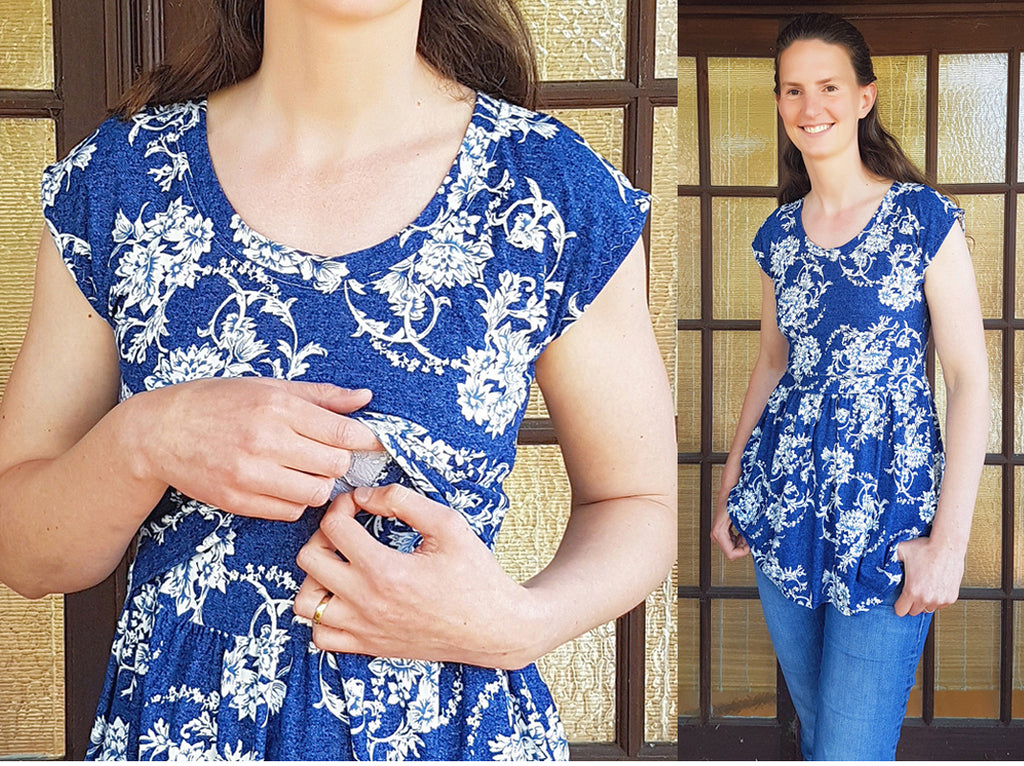
    This modification is the original idea of one of our pattern testers Isaline (@isalinestinystitches). Isaline needed to make her Pearlie Peplum Top nursing friendly and modified the pattern using a clever layering system for the Front Bodice.

    How does it work? There's a layer underneath the Front Bodice with a deep "v" cut-out which attaches to the top of the peplum skirt. The Front Bodice has a horizontal waistband which sits free of the peplum skirt and can be lifted up and away to access the "v" cut-out. 

    Isaline kindly offered to share her tutorial with Peach Patterns customers and put together the following step-by-step instructions so that you can make your own nursing-friendly Pearlie:

    WHAT YOU'LL NEED:

    • The Pearlie Dress & Peplum Top PDF Sewing Pattern for Women;
    • Your fabric. You'll need an extra bodice length of fabric plus about 4" (10cms) to make your inner "v" layer and waistband for the Bodice Front in addition to the yardage set out in the pattern instructions;
    • A pen, ruler, clear elastic and a double sided water soluble sewing tape (Wonder Tape brand for example). The last two are optional but highly recommended for a professional result and to make sewing easier.

    STEP 1: CUT FABRIC PIECES

    (NOTE: if you need to shorten or lengthen your Bodice Front pattern piece to adjust for your height, do this before the steps below).

    • The Bodice Front pattern piece should be lengthened by 1/2" (12mm) at the bottom edge.
    • For the Bodice Front waistband you will need to cut a rectangle of fabric as follows. Measure across the bottom of your Bodice Front and multiply by 2. Multiply again by 0.85 and add 3/8" (1cm) for seam allowance. This is the width of your band. The height of your waistband is 3.5" (9cms). 
    • To make your inner "v" layer take your Bodice Front pattern piece and draw a deep "v" from the inner shoulder to at least 3" (7.5cms) above centre front. (The photo below shows you how to do this). To check that you've got it right, place the pattern piece over your chest. The "v" should finish about 1" (2.5cms) higher than the bottom of your bra.  Draw an additional line from the side of the pattern piece straight up to the shoulder. Fold your pattern piece along the new lines to cut your "v" layer or trace it off onto another piece of paper.
    • All other pattern pieces are unmodified and should be cut as indicated in the pattern.

    STEP 2: SEW ELASTIC TO THE INNER "V" LAYER

    • Place some lengths of clear elastic along the inner edges of the "v" as shown in the first photo below using your double sided tape to keep the elastic in place.
    • Fold the edges of the fabric over to encase the elastic and pin or secure with clips.  You will need to make a small cut into the point of the "v" to help you fold that area.
    • Stitch using a large zig-zag or stretch stitch as shown in the second photo below making sure you don't stretch the elastic as you sew.
    • Finish the sides of your inner "v" layer with an overlocker/serger or zig-zag stitch (optional).

    STEP 3: ATTACH THE WAISTBAND TO BODICE FRONT

    • Fold your waistband in half wrong sides together lengthways and press.
    • Match the middle of the long raw edges of the waistband to the centre front of your Bodice Front and pin or clip the fabric through all layers (see photo below).
    • Sew using your overlocker/serger (or with a stretch stitch), stretching the fabric slightly as you sew to fit across the width. 

    STEP 4: GATHER SKIRT/PEPLUM TOPS AND ATTACH TO BODICE

    • Gather and attach the Skirt Back to the Bodice Back.
    • Gather and attach the Skirt Front to the inner "v" layer.

    STEP 5: FINISH BODICE ASSEMBLY

    • Pin your Bodice Front/waistband right sides together with your Bodice Back/Skirt Back (see first photo below).
    • Pin the inner "v" layer/Skirt Front over the top right sides down (see second photo below).
    • Sew the shoulder seams and side seams through all the layers and finish with your overlocker/serger or zig-zag stitch.
    • Finish the neckband and hem following the sewing instructions in the pattern.

    And that's it! Come over and join us in the Peach Patterns Sewing Group on Facebook to share pictures of your new dress or top.
    "Mama Leilani Top & Dress": Fabric Inspiration & Resources

    This is the second part of a two part blog series about the Peach Patterns Mama Leilani Top & Dress PDF Sewing Pattern. In this part we're covering everything you need to know to choose the best fabric for your top or dress. The series also covers pattern options, sewing tips, design inspiration and blog reviews in Part 1 (here).

    The key to getting a great finished top or dress with the Mama Leilani pattern is choosing the right fabric. The main feature of the design is the ruffle overlay and in order to create the pretty folds you are aiming for with this feature its important to use a fabric that will behave in the right way when being worn. This is especially so with the women's dress as there is the added consideration that the overlay needs to drape over our curvier figures.

    Rayon

    The rayon fabrics pictured here are (clockwise from upper right):

    Watercolor Burst Rayon Challis in Blue/Coral from Style Maker Fabrics

    Premium Floral Picasso Rayon Poplin from LA Finch Fabrics

    Turquoise Digital Boho Rayon Challis from LA Finch Fabrics

    Ginger Yellow Rayon Fabric by JPFabrics on Etsy

    The favourite fabric choice for this pattern is undoubtedly rayon (also known as rayon challis or viscose) as it will give you the optimum drape and flattering silhouette.  All of the big chain fabric shops and loads of online sellers now carry rayon in a huge range of both prints and solid colours.  Rayon can be a little more challenging to cut and sew than cotton.  The best tip for cutting your pattern pieces when using rayon is to find as large a surface as possible and spend extra time smoothing your fabric out and aligning the selvedges. Use plenty of pins AND fabric weights.  If the fabric does shift a little and you find your matching pieces are slightly different, pin them together and trim them to match before sewing.

    Silk or Crepe

    The silk and crepe fabrics pictured here are (clockwise from upper right):

    Crepe Amaranthe from MaaiDesign

    Designer Silk Crepe de Chine from Cali Fabrics

    Telio Moda Crepe Bird from Fabric.Com

    Savannah Crepe Ivory from Fabric Godmother

    If you are up for a challenge and want to create a pretty, special occasion dress you may want to have a go at using silk or crepe for the pattern.  The advice about cutting and sewing fluid fabrics (see rayon) applies even more here!

    Cotton, Voile or Lawn

    The cotton fabrics pictured here are (clockwise from upper right):

    Paisley Block Print Cotton from IndianStores on Etsy

    Textured Printed Tencel from Spotlight

    Parakeets Cotton Lawn from Fabric Godmother

    Art Gallery Sage Voile Painted Night Desert by Bari J from Fabric.Com

    If you are going with a cotton fabric, avoid any mid weight to thicker cottons such as patchwork, quilting weight cotton and broadcloth. Instead choose soft and light weight options like voile or lawn or tencel. Indian style block print cottons are another fabulous choice as they usually come on a base cloth which is super soft to touch and comfortable to wear.

    No matter which fabric you choose, don't forget to wash and press it before cutting your pattern pieces. Many of the fabric types discussed here will shrink after washing and this is especially so for rayon.

    Adjustable Straps

    Image at left: by Susana of Suco by Susana Image at right: Sew Squirrel

    You won't regret having a go at making a Mama Leilani Top or Dress with Adjustable Straps. It's easier than you think and there's an additional full photo tutorial in the pattern to show you exactly how to do it. Here are some links to suppliers who sell the ring and slider hardware you'll need for this option:

    Australia:

    I have used and recommend Sew Squirrel.

    Textile Traders.

    Europe and the UK:

    English Couture Company

    Evie La Luve DIY

    Studio Costura Shop on Etsy

    North America:

    A search on Etsy for "rings and sliders" and/or "bra making hardware" will bring up several US sellers of these supplies.  Arte Crafts is one we found which offers a good range.

    Another tip shared in the Peach Patterns Sewing Group is to recycle rings and sliders from old bras or lingerie that you’re no longer wearing.

    And that's about it for now! I hope you've enjoyed reading this series and if you make yourself a Mama Leilani Top or Dress please hop over and share it in the Peach Patterns Sewing Group and/or on Instagram with the hashtags #peachpatterns and #mamaleilani.

    "Mama Leilani Top & Dress": Pattern Options

    I hope you’ll enjoy this (long-overdue) round-up of the Peach Patterns Mama Leilani Top & Dress PDF Sewing Pattern. Part 1 (this post) explains all the different options that come with this pattern, tips on sewing and links to blog reviews.  Part 2 contains some great fabric suggestions (lots of crafty eye-candy there!) and an online resource list.

    Top (with Single Ruffle Overlay): Sewing this option is recommended for an easy way to get to know the Mama Leilani pattern! It doesn’t require much fabric and you can quickly get a feel for the fit and gain the confidence you need to make the dress. Team your Mama Leilani Top with shorts or jeans for everyday wear or a pencil skirt/ slim fit pants for a dressier look.

    Top (with Double Ruffle Overlay): The extra layer and fabric folds that are a feature of the double ruffle are really pretty and emphasize the feminine look of the top. 

    It’s important when making the double ruffle option to use a fabric which behaves well during sewing and when the top is being worn.  Lightweight is better for this option! Think rayon, lightweight lawn, voile or gauze. Or (if you’re game!) try chiffon, crepe or other silky fabrics. (Part 2 of this series has lots of suggested fabric options for you to check out).  Also search Google and Pinterest for tips on sewing silky or slippery fabrics and use a combination of pattern weights (food cans can double as these) and lots of pins when cutting. 

    A few customers have asked whether constructing the double layer is complicated and the answer is no! With both pieces right sides out, you simply baste the shorter ruffle over the top of the longer ruffle around the neckline and armholes. Then turn the piece wrong side out and attach it over the top/dress (which is also wrong side out in this step) in the same way as you would a single ruffle. (The sewing instructions contain all the details you need).

    Knee-Length Dress: For the perfect easy-wearing summer sundress you’ll want one (or more) of these in your wardrobe. Or create a special occasion dress with the pattern by using black silk or crepe (just add heels and your favourite statement jewellery to complete the look). In fact the Knee-Length Dress looks equally good with summer sandals or heels. And as with the top, you can add a single or double ruffle overlay.

    High-Low Dress: Add some drama with the High-Low Dress option. The three-quarter length makes it a more dramatic option for evening wear and date nights while still really practical to wear and walk in.

    Adjustable Strap or Shoulder Ties: You can choose to make regular shoulder ties or adjustable straps for your Mama Leilani Top or Dress. If you’ve never made adjustable straps before you’ll be surprised how easy (and satisfying!) they are to do. The sewing instructions contain a full photo tutorial with a thorough step-by-step explanation. Check out Part 2 of this blog series for links to suppliers that offer a range of pretty ring and slider hardware packages to make your adjustable straps. 

    Creating a Faux-Romper Look: Mama Leilani Top teamed with Avalon Shorts

    After releasing the Leilani Romper for Girls, lots of you asked for it to be offered in ladies sizes. After getting more thorough feedback we discovered customers wanted a slightly more practical option and decided to create a bundle of two patterns that give you the look of a romper but all the practicality of separates.  The Avalon Shorts for Women are easy-fit pull-on shorts and their relaxed boxy design is the perfect match for the Mama Leilani Top.  Get the patterns together in a (discounted) bundle and make them in the same fabric for an instant romper/playsuit look.

    The shorts can also be purchased as a standalone pattern here (and are a great summer staple that you can wear with any of your favourite tops or tees).

    Mama Leilani & Leilani Dress for Girls Bundle

    The Mama Leilani was a spin-off of the previously released Leilani Dress for Girls. Get the women’s and girls' pattern in a (discounted) bundle and make one for your mini-me as well!

    Layering, Embellishing, Pattern Hacks:

    Add a cute cardigan or jacket over the top of your Mama Leilani for when the weather cools.

    Try embellishing the top or dress with a lace overlay or hem. Or add pom-poms or trim to the ruffle overlay or hem.

    If you're feeling adventurous, there are lots of ways you can modify the pattern to put a unique touch on your top or dress. Sarah of Sweet Meadow Threads made a dramatic maxi dress with her Mama Leilani pattern after seeing a similar one on Pinterest.

    Blog Reviews: Some of our lovely testers wrote blog reviews of their experience making their Mama Leilani Tops and Dresses and you can check those out below:

    Dagbjort made the Top with Single Ruffle and the High Low Dress. 

    Read Dagbjort's blog post.

    Susana made the Knee-Length Dress. 

    Read Susana's blog post.

    Tiffany made the Top with Single Ruffle and the Knee Length Dress.

    Read Tiffany's blog post.

    Sarah made the Knee-Length Dress.

    Read Sarah's blog post.

    Angeline made the Knee-Length Dress.

    Read Angeline's blog post.

    Thanks for reading and don't forget to check out Part 2 of this series which covers fabrics options and ideas for making your Mama Leilani: "Mama Leilani Top & Dress": Fabric Resources & Inspiration.


    Peach Patterns "Mama Leilani" Top & Dress PDF Sewing Pattern : Tester Call

    Peach Patterns

    I'm so excited to announce the tester call for Peach Patterns first womens' dress pattern. Following on popular demand for a "mama" version of our Leilani Dress for Girls which was launched last summer, we will soon have a grown up version available.  The Mama Leilani sewing pattern will have the added options of a top length, a single or double ruffle and adjustable bra-style straps (as well as ties).  You'll find the link to the tester sign-up form at the bottom of the post.

    The dress pictured is the Knee-Length option made in a lovely flowy rayon from Blackbird Fabrics (fabrics with a great drape-factor are essential to the design of this dress!) The other options are shown on the pattern cover illustration.

    The Mama Leilani is quick and easy to sew and will be your go-to top or dress for summer. It looks great in vibrant prints for everyday or you can glam it up by using a special fabric with the high-low version for a dramatic night-time look.

    INTERESTED IN TESTING THE MAMA LEILANI TOP OR DRESS?

    APPLY HERE 

    (Note: I will be running the test from 19 to 26 October 2017 in a closed Facebook Group which you would need to join.) The Size Chart and Yardage Chart are included on the form.

    If you want to be notified when the Mama Leilani releases (and hear other Peach Patterns news) be sure to sign up to our newsletter:

    Subscribe to our mailing list

    * indicates required


    Stay in the Peach Patterns loop and: 

    Follow my blog with Bloglovin